
|
Last I left off we were in the middle of sewing the doll dress. We completed the sewing of the bodice pieces, turned them right side out and pressed them. Once they are pressed flat correctly you need to pin together and sew the shoulders together as well as the bodice sides. Also you should have pressed the skirt hem to make it nice and flat. Once the bodice is sewn together then you will need to pin the skirt to the bodice bottom. Have the bodice right side out and the skirt wrong side out when pinning both rough edges together. Also pin the two back sides slightly overlapping about 1/4" and align with the skirt seam so that is also at the back of the dress. I then pin to the front and two sides as well. I also add a small pleat and pin halfway between each of those pinned places. Once you have all the pins in place then sew the bodice to the skirt with a 1/4" hem. Then you can press it to flatten hems and seams if you wish and add the velcro to the top corners of the back to close it. Viola, the dress is complete. You can always add other embellishments as well. A nice ribbon hand sewn at the waistline or bedazzle it if you are feeling sparkly. I hope you enjoy this pattern. Below are some more pictures of the sewing and the complete dress. You can get the pdf pattern from my etsy store at: https://www.etsy.com/listing/273403586/18-doll-dress-pattern?ref=shop_home_active_1
0 Comments
I have been wanting to offer a dress pattern for the 18" dolls. It is a fairly simple pattern to follow and turns out really cute on the dolls. I have cut the material and begun to sew the dress pieces. This pattern came about when my daughter first recieved her my life doll for her birthday and she asked me for some new outfits. I thought, " Hey I can make some." Now here is what I came up with. I chose a shiny material to make a fancier dress for this tutorial. The first dress I made I had the skirt much too small so I adjusted the pattern several times before perfecting it. When seeing the top pieces I start with the right sides together and (on the sleeveless dress) and see together just the neckline and arm hole sections on the front. On the back pieces you will need to sew the arm hole sections and when you do the neckline also turn and sew down the back. Then turn the pieces right side out and iron flat before sewing the pieces together at the sides and shoulders. Also sew the hem around the base of the skirt and sew the skirts back seam together. This is an excellent start and I will finish the tutorial in my next post so be sure to stop back. Now here's a treat, my first trial dresses. Also included is a crochet outfit I also made. Fell free to share this post and any others you like. 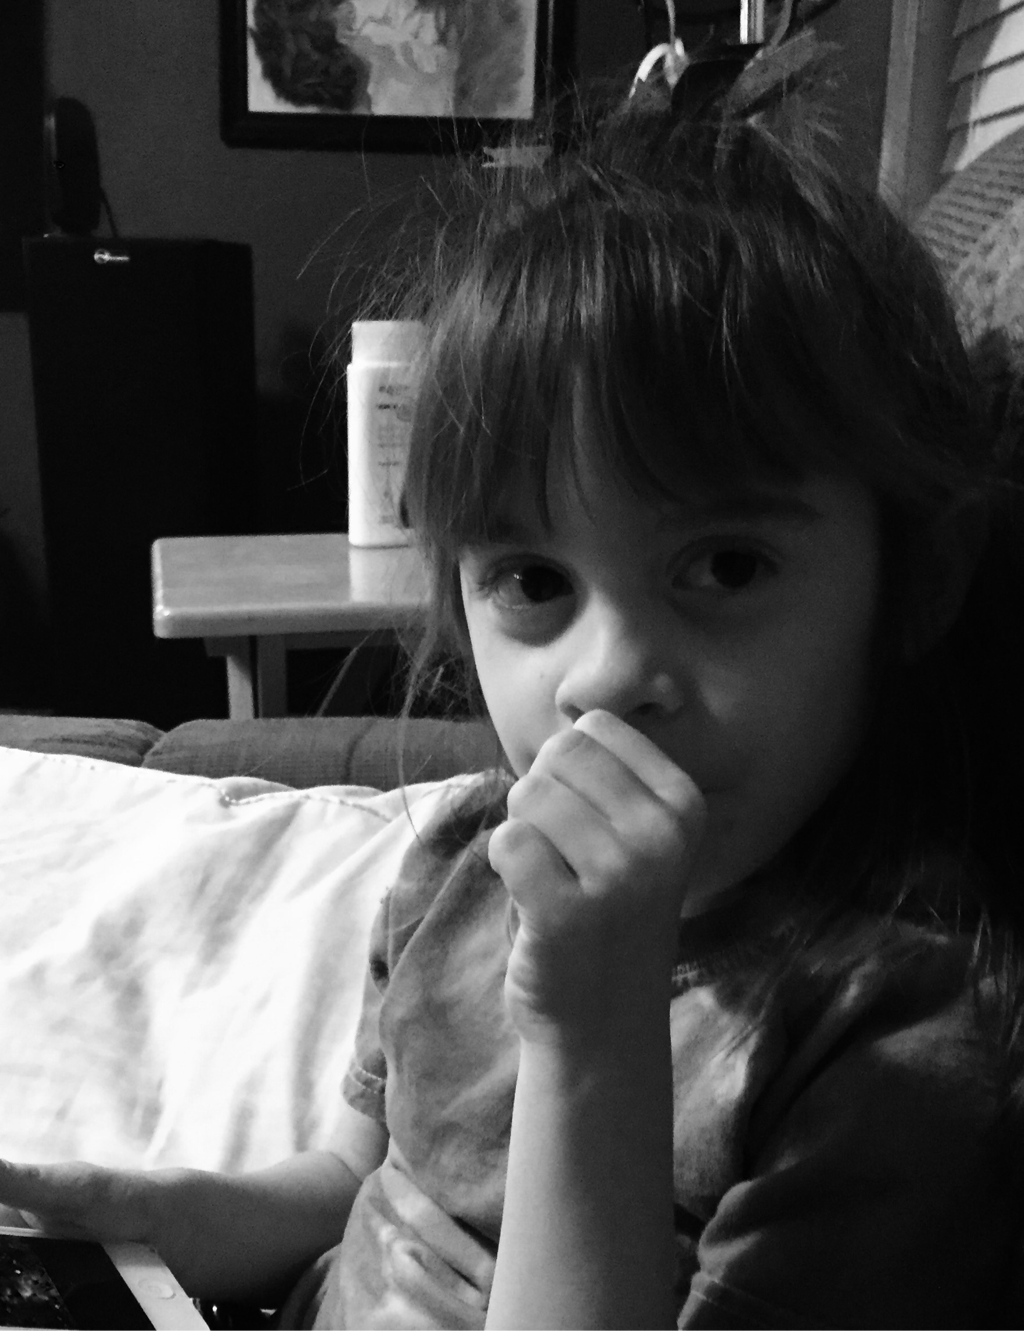 Does anyone else have one of these.....a thumb sucker? My little girl has done this since birth but now she is 6 and has adult teeth coming in. They look a little they are coming in farther back than they should so my husband is on the defensive. We are looking for ways to discourage her from sucking her thumb as much as possible. I thought why not crochet something. My husband saw some online but I didn't need a pattern as long as she was sitting next to me for testing size I knew I had it covered. I began with a magic circle and crocheted 6 single crocheted in it, joining to the first sc.
Ch 1, sc 1 in first stitch then 2 sc increase in next stitch, (9 sts) Ch 1 and sc around, join. Repeat this til u get the right length. Once you get the length you need then crochet in rows with 7 sc each row for 4 rows. Then sc in the end of those 4 rows for as many rows as you need to wrap around the wrist. Join the band with the other ends of the original 4 rows. Then done, just slide it over the thumb and the band around the wrist. I hope it works for you. As long as you can get them to keep it on. That's the real trick. Being a working mom, having help at home is awesome. Unfortunately I have two little angels who are part of the entitled generation, no thanks to myself for spoiling them, so getting that help is quite difficult. So since my little angels are so set against any kind of labor, making the jobs fun and rewarding is paramount in getting any cooperation out of them. I recently came across these cute little chore boards online. I haven't created them myself yet but I feel like this is the the weekend project for Superbowl weekend. Here is the link to the blog that has all the instructions for creating these sweet chore boards. http://aspottedpony.com/diy/make-cleaning-fun-for-kids-with-a-simple-diy-chore-chart/ I plan on hitting up the local thrift shops to find the cookie sheets for cheap and I always have tons of ribbon on hand for making hair bows and other crafts so the only things I need to search for are the little broom & dustpan combos in cute colors. 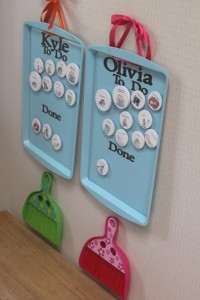 As another form of incentive I have a reward chart that I fill with small stickers for every chore & homework assignment completed (without a fight). I put the without a fight clause in because if I didn't then I would be rewarding them for giving me a colossal headache along with the chore or assignment and I just don't need that. So at the end of each row of stickers is a $5 reward. Usually it takes 2-3 weeks to complete a row in our house. That shows just how little chores I get out of them usually. Although you have to manage the chores when you do this because they try to make picking up 3 toys into a full chore and get as many stickers as possible in one day, so stay strong friends. Of course you hold the power to take away stickers as well for any bad behavior. I think these two chore boards will work great with my reward chart in getting some much needed help around the house. I hope they help you out too. Below is the reward chart. You can right click and "save image as" and print it on a regular sheet of paper if you would like to use it yourself. 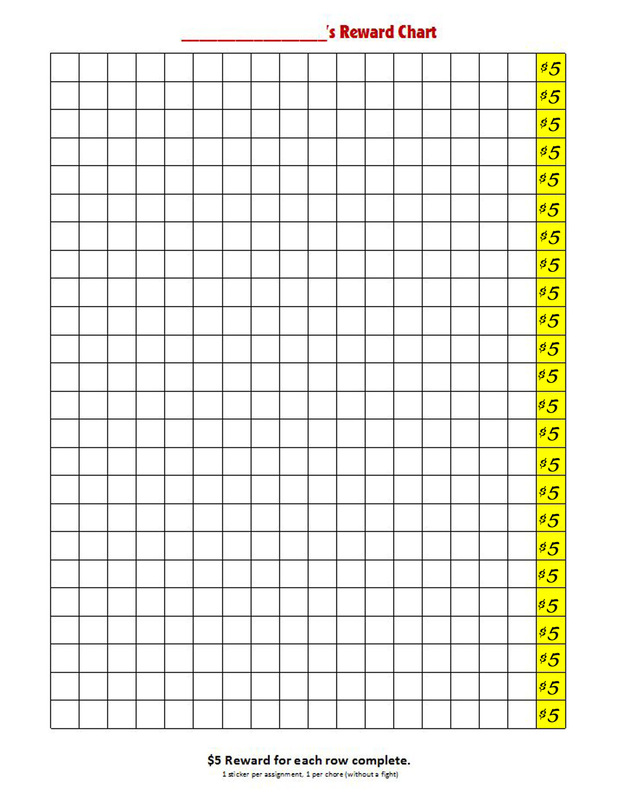 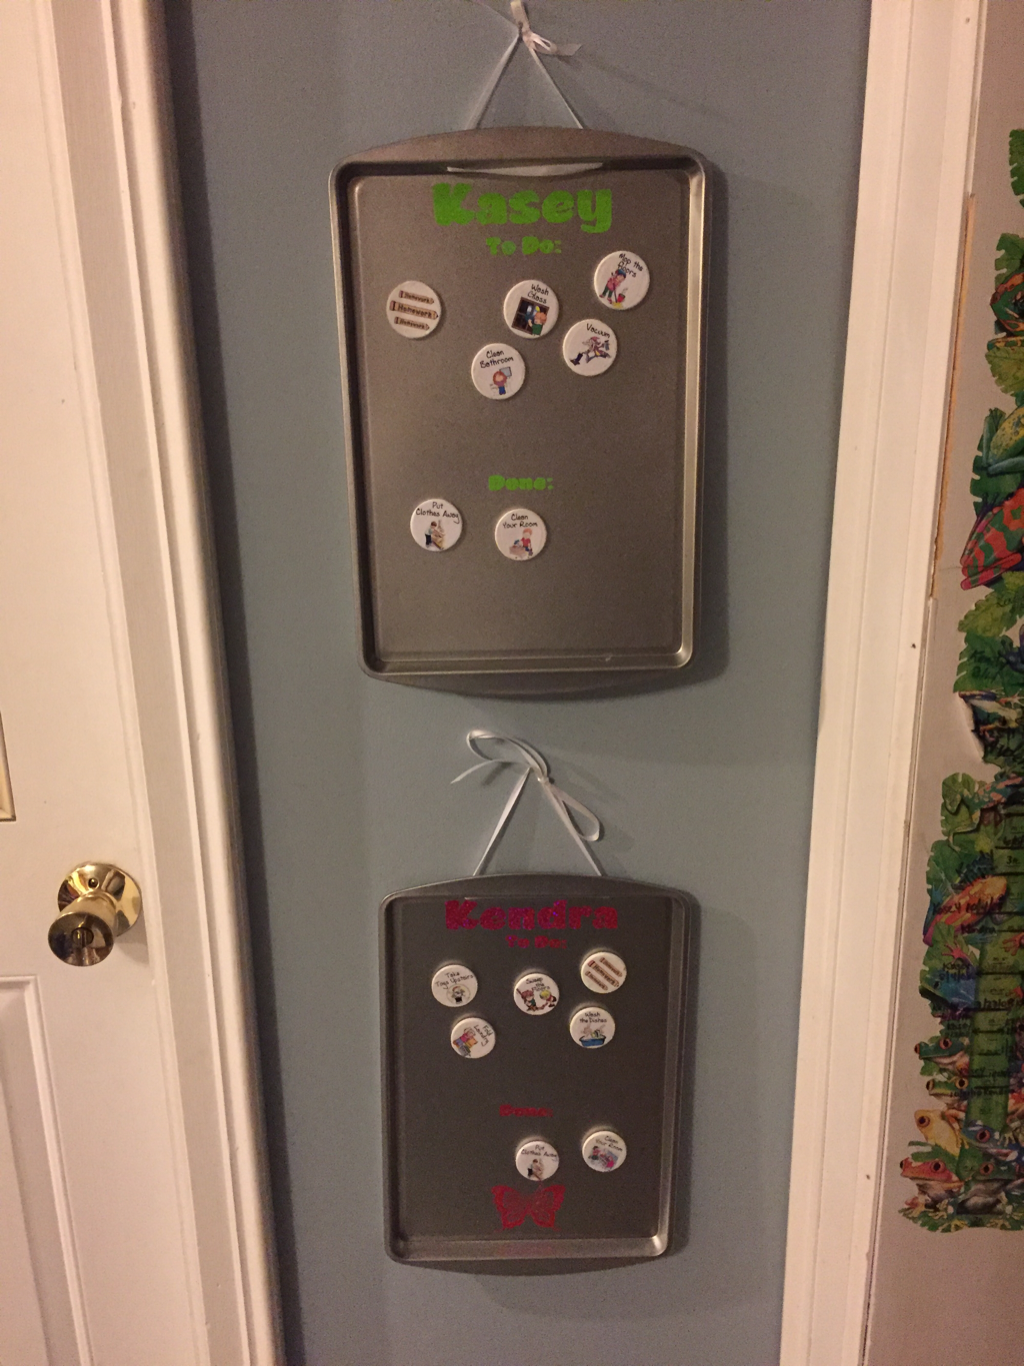 So this is how mine turned out. I liked the chrome finish so I kept it. Can't wait to see what you come up with.
|

Hello!I'm Michelle, a wife, mom and full time graphic designer. I have been working in graphic design for over 20 years. I like to share things about my everyday life and projects I'm working on. Hopefully some of what I share can be valuable to you as well. You can learn more about me here.   Archives
January 2022
Categories |


 RSS Feed
